Subscribe: RSS
Subscribe: RSS
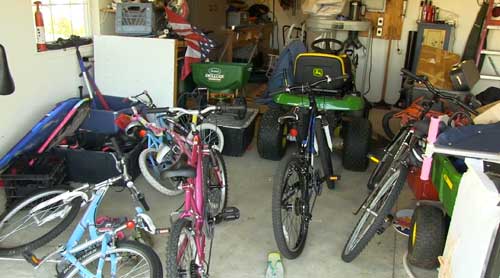
Below is an article from our friends at Zillow. We know all our fans expect to see video with each post, so The Handyguys decided to make a video showing some before and after of our messy, then clean (sort of) garages. Check out the article below and enjoy the video.
Tips for Cleaning Out a Garage
By Tali Wee of ZillowPart of being a responsible homeowner is making the necessary improvements to keep the property safe. Organizing and cleaning out cluttered garages tend to be one improvement that homeowners delay to correct.
The thought of sorting through the boxes and piles can be overwhelming. But a cleaned garage brings satisfaction each time the homeowner pulls out a bike, locates a tool or accesses the water toys. The cleaned spaces also offer homeowners peace of mind knowing their garages aren’t havens for vermin, fire hazards, impassible escape routes or black holes for stored goods.
To find motivation to clean out the garage, think back to the days of searching for a home. Recall desiring a large garage to store goods, park cars and even act as an in-home workshop? Once homeowners feel inspired to bring their garages back to working condition, they can follow these six basic steps to make the process simple and successful.
1. Prepare
Before the big day of de-cluttering, organizing and cleaning, homeowners should gather the necessary supplies to make the process easier. Grab several large trash bags, empty storage containers, labels or tape and markers, newspaper for packing and fabric softener sheets for fresh scents. Don’t forget the cleaning supplies needed such as a broom, dustpan, cleaning solution and paper towels. Consider a radio or boom box to keep participants motivated with cheerful music. Lastly, have a large bottle of water for each person contributing. All the hard work leads to thirst, and leaving the garage for multiple water breaks halts momentum.
2. Commit to a Plan
The most efficient method of organizing the garage is to move items just once. Agree on a final layout of the space before starting. Choose a home for the tools, an area for the camping gear, skiing gear, holiday decorations and automotive supplies. That way, as the organizing commences, these items can be moved into a pile in their designated areas, eliminating multiple moves. Some garages are so full that the cleaners must move items to the lawn to get organized before moving back in. If possible, try to avoid the unnecessary moves by committing to a layout before launching the organizing process. Sketching out the desired final space can help keep homeowners on track.
3. Begin Sorting
Check the time and be sure to factor in a lunch break to avoid feeling burnt out or overwhelmed. Set up a trashcan, recycle bin and a box for charity. Start somewhere that feels right. Place the items in a pile in their designated new locations or in the proper receptacle. Don’t worry about putting the items away yet, just work on sorting through all the items and create sensible piles. In this stage, the garage may seem messier before it appears more organized. Stick with the program until everything is sorted properly.
4. Organize and Label
Next, begin organizing the piles. Pull out the storage containers and begin packing them carefully with sensible items. For instance, all the exterior holiday lights should be packed in one container, with each spool separated by a page of newspaper to avoid tangling. Then label the container “Exterior Holiday Lights” and stack it in its new home. Follow the same steps for the interior lights and fragile decorations. Pack gloves, scarves and extra blankets in a container with a fabric softener sheet to keep them smelling fresh and be sure to label the boxes or bins clearly. Put away tools in their designated locations, hang bicycles and organize paint cans. Be sure to label everything for easier access later.
5. Clean
Once the floors have been cleared of belongings, begin cleaning away the debris. Sweep or vacuum the garage, trying not to stir up too much dust. Mop the floors and clean off any surfaces. Make sure there are wide enough clearances to access stored items, to build in the workshop area or to park cars, depending on the homeowners’ desired usage.
6. Toss, Donate or Sell
Lastly, it’s time to get rid of the excess. Load up the trash in a truck and take it to the dump. Be sure to recycle everything that qualifies. Swing by a local charity to hand off all the clothes, vases and furniture that no longer have a place at home. Homeowners planning to have a garage sale should schedule the sale shortly after cleaning out the garage so the excess items don’t trickle back into the clean space.
After all six steps have been completed, feel proud. Cleaning the garage is a dreaded task for many, but it’s one of the many maintenance responsibilities that accompany homeownership. The space should be cleaned every three to six months to keep labor manageable. Make sure the items in the containers still match up with their labels and wipe down all surfaces with fresh-scented cleanser.

Glad I found this- I’m definitely going to have to show my husband and set him to work now!
Man, no easy task. I used to keep the garage spotless when we moved into our home years ago. 4 kids and 10 winters later, it’s a daunting task. Good post.
I love those gorilla bars. Easy way to get things off the floor.
I’ve got 4 bicycles in my garage that take up a lot of space and block other objects. I’ve also got a big group of lawn and landscape tools that are a mess and not easy to access. The hook systems look like an effective solution to my problem areas of my garage. I also like the tip about planning my garage organization before I get started with it. I think that will help keep me motivated to get it finished.
I so need to do this before the snow starts, I want to be able to fit my car in the garage again. I will do it this weekend, thanks for the motivation!
I sometimes get asked about garage organization too and I myself need to clean mine! These are great tips though. I could use these myself.